Setting up an A record for your website is a crucial step in ensuring that your domain name properly links to your website’s IP address. This process allows users to access your site by typing a simple domain name instead of a complex numerical IP address. In this article, we’ll explain what an A record is, why it’s important, and guide you through the steps to set one up for your website.
Introduction
When someone types your domain name into their browser, the Domain Name System (DNS) is responsible for mapping that domain to an IP address, allowing the browser to reach the correct web server. The A record is the key piece of information in this process. Setting it up correctly is essential to ensure your website is accessible.
Importance of Records for Connecting Your Domain to Your Website
The A record is the most basic type of DNS record. It maps your domain name (like example.com) to an IPv4 address. Without an A record, your website would be unreachable through a domain name. A correct A record ensures that when someone types in your domain, they are directed to the right server hosting your website.
Related Posts:
- How to Set Up an A Record for Your Website
- Setting Up Records for Email and Other Services: DNS Setup
- What Is a DNS Zone File and How Do A Records Fit In?
Brief Overview of the Process
Setting up an A record involves several steps:
- You need to have a registered domain name.
- You must access your DNS management console (through your hosting provider or DNS provider).
- You will need the correct IP address for your website’s server.
- Finally, you will configure the A record in your DNS settings and save the changes.
Let’s dive deeper into these steps.

What You Need Before Setting Up
Before you can set up an A record, there are a few things you need to have in place.
Domain Name Registration
You need a registered domain name for your website. If you haven’t already, you’ll need to purchase and register a domain through a domain registrar like GoDaddy, Namecheap, or Google Domains. Once your domain is registered, you’ll have the right to configure its DNS settings.
Access to DNS Management Console (GoDaddy, Cloudflare, etc.)
Once you have a domain, you need to access your DNS management console. This is usually provided by the company where you registered your domain or your web hosting provider. Popular DNS management tools include:
- GoDaddy DNS management
- Cloudflare DNS settings
- Bluehost DNS manager
- Namecheap DNS settings
You’ll need your login credentials to access these settings.
IP Address for Your Server
To set up the A record, you need to know the IP address of your web server. This IP address is typically provided by your web hosting provider or your server administrator. It’s a numeric address, like 192.168.1.1, that uniquely identifies the location of your server on the internet.
Step-by-Step Guide to Setting Up an A Record
Now that you have everything you need, follow these steps to set up an A record for your website.
Related Posts:
- What Is a DNS Zone File and How Do A Records Fit In?
- What Is an A Record in DNS?
- A Record TTL: What It Is and How It Affects Your Domain
Step 1: Access DNS Settings
The first step is to log in to your DNS management console. This will vary depending on where your domain is registered. Here’s how to do it on a couple of popular platforms:
- GoDaddy: Log in to your GoDaddy account, go to your “My Products” page, and select “DNS” under the domain you want to edit.
- Cloudflare: Log in to your Cloudflare account, select the domain you want to configure and go to the “DNS” tab.
Step 2: Create a new Record
Once you’re in the DNS management interface, look for the option to add a new record. It’s often labeled “Add Record” or “Add A Record.” Select A as the record type.
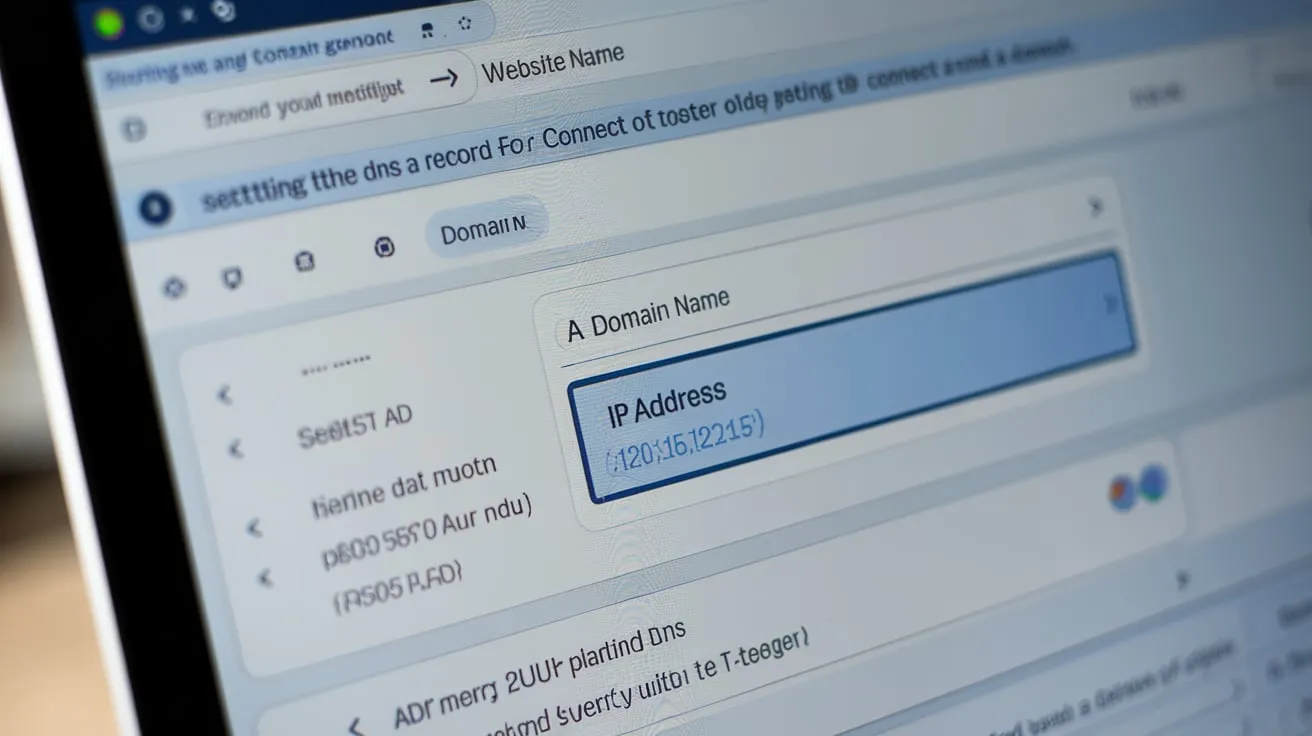
Step 3: Input the Domain/Subdomain and the Corresponding IP Address
Now, you’ll need to input two critical pieces of information:
- Name: This is the domain or subdomain you want to point to the server. For example:
- If you want to set up the A record for the main domain, input @ or leave the field blank (depending on your DNS provider).
- If you want to set up the A record for a subdomain, like www.example.com, enter www in this field.
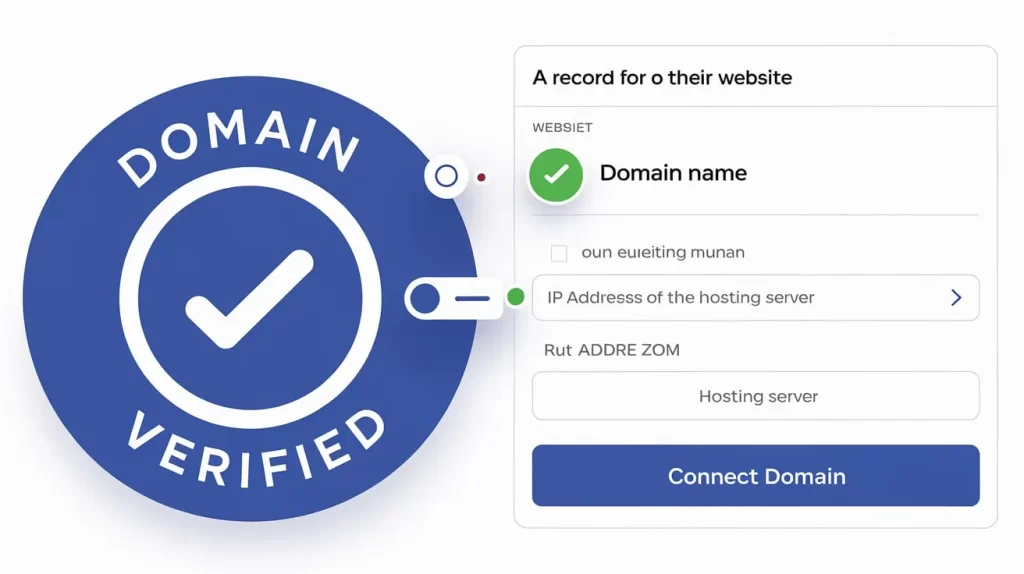
- IP Address: This is the IPv4 address of the server where your website is hosted. It will look like 192.168.1.1 or something similar. Input this IP address in the “Value” or “Address” field.
Step 4: Set TTL (Time to Live) Value
TTL determines how long the DNS record should be cached by DNS resolvers. The default TTL is usually fine for most users. A typical TTL value is 3600 seconds (1 hour), but you can adjust it as needed.
- TTL: 3600 seconds (or 1 hour) is a standard value that is often used.
Step 5: Save the Changes
After you’ve entered the domain name (or subdomain), IP address, and TTL, click “Save” or “Add Record.” This will update your DNS settings with the new A record.
Common Issues When Setting Up A Records
Setting up an A record may seem straightforward, but a few common issues can arise. Let’s go over some of them and how to troubleshoot them.
Typo in the IP Address
One of the most common mistakes when setting up an A record is entering the wrong IP address. Double-check the IP address provided by your hosting provider or server administrator to make sure it’s accurate.
Incorrect TTL Settings
If you set the TTL value too high, changes to your DNS records may take longer to propagate. Conversely, setting it too low could result in excessive DNS lookups, slowing down the resolution process. A standard TTL value of 3600 seconds (1 hour) is generally a safe bet.
DNS Propagation Time
After saving the A record, it can take some time for changes to propagate across the internet. This can take anywhere from a few minutes to 48 hours, depending on the TTL value and the DNS resolvers around the world. If you’re not seeing changes immediately, be patient.
Key Takeaways
Setting up an A record for your website is essential for making sure that users can reach your site by typing your domain name into their browser. The process is simple and can be done through your DNS management console with a few straightforward steps. Always ensure you enter the correct IP address, set an appropriate TTL, and allow time for DNS propagation.
Tips for Troubleshooting
- Check the IP address: Make sure the IP address entered is correct.
- Verify DNS settings: Ensure the DNS record is pointing to the correct server.
- Wait for DNS propagation: It might take time for the changes to take effect globally.
- Clear browser cache: Sometimes, cached DNS information in your browser can cause delays in seeing changes.
Where to Get More Help
If you’re having trouble setting up your A record or need further assistance, there are a few places you can get help:
- Your DNS provider’s support: Most providers have guides and support teams available.
- Online forums: Communities like Stack Overflow and DNS-related forums can be helpful.
- Your web host: If you’re using a hosting service, they might offer additional support for DNS configuration.
- A record: Links your domain name to an IPv4 address, allowing users to access your website.
- Steps to set up: Log in to your DNS management console, create a new A record, input the domain/subdomain and IP address, set TTL, and save the changes.
- Common issues: Watch out for typos in the IP address, incorrect TTL settings, and the DNS propagation time.
By following these steps and tips, you’ll be able to set up an A record for your website without issues. Keep in mind that DNS changes might take some time to propagate, but once everything is set up correctly, your website will be accessible to users around the world.